How to Discover Every Asset on Your Network Automatically
Learn how to discover every asset on your network automatically with this step-by-step guide. Fast, simple, and perfect for IT pros and asset managers.
If it’s connected to your network, it’s an asset and if you don’t know it’s there, it could be a problem. That’s why it’s so important to discover every asset on your network automatically. Not just once, but on an ongoing basis.
The reality? Most IT environments are full of surprises, unpatched devices, forgotten virtual machines, shadow IT setups, and mystery IoT gear. You can’t protect or manage what you can’t see.
The good news: Getting full visibility isn’t as complicated as it sounds. With the right steps (and the right tools), you can go from “what’s even on this network?” to “we’ve got eyes on everything.”
In this quick guide, we’ll show you how
Why Automated Asset Discovery Matters
Before diving into the steps, let’s understand why automation is essential:
- Scalability: Networks grow rapidly, and manual methods can’t keep up.
- Accuracy: Automated tools reduce human errors in identifying assets.
- Security: Unknown devices or services can be vulnerabilities; automation helps identify them.
- Compliance: Regulations often require a complete asset inventory.
Here’s a practical guide to implementing automated asset discovery.

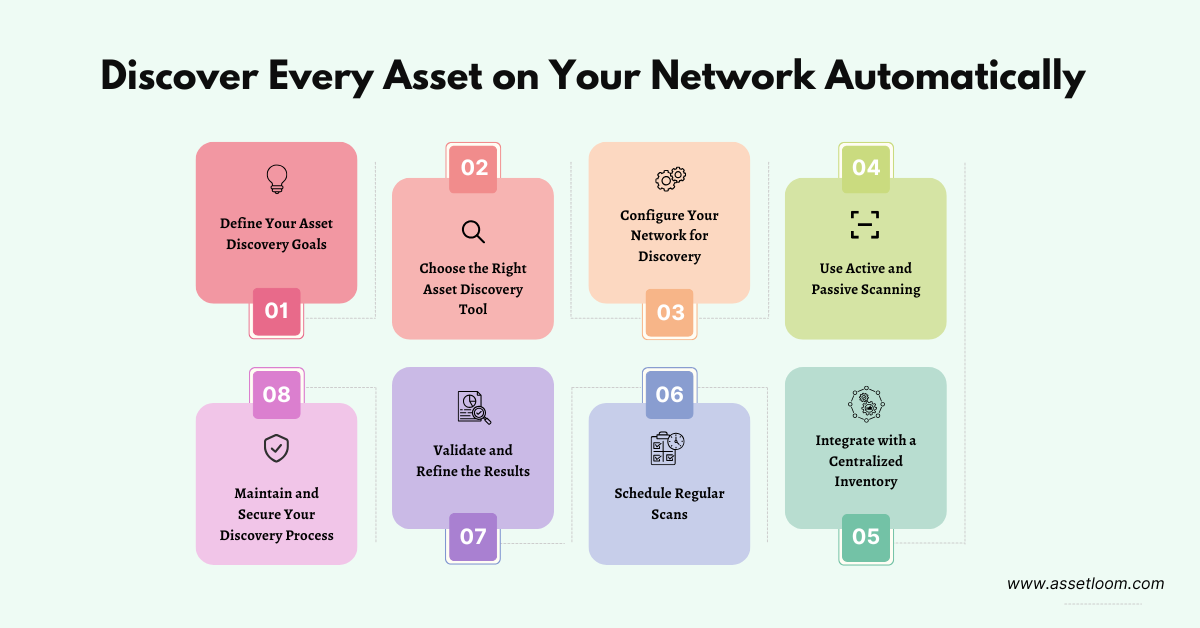
Step 1: Define Your Asset Discovery Goals
Start by identifying what you need to discover:
Here’s what to think about:
- Devices: Laptops, servers, routers, IoT gear, the smart toaster someone snuck in.
- Software: Apps, OS versions, background services — the good, the outdated, and the “wait, what is that?”
- Network Services: Open ports, strange protocols, shadow cloud accounts.
- Scope: Are you scanning internal networks only? Cloud environments? A hybrid mix of both?
Pro tip: If you’ve got compliance requirements (looking at you, GDPR and HIPAA), make sure your discovery goals line up. You don’t want to miss something critical and find out during an audit.
Think of this as your “asset discovery wishlist.” Write it down. You’ll thank yourself later.
Step 2: Choose the Right Asset Discovery Tool
Not all asset discovery tools are created equal — and not every network needs an enterprise-grade monster. Choose one that fits your size, complexity, and budget (and your sanity).
Here are some options:
- Open-Source Tools: Nmap, OpenVAS, or Zabbix for cost-effective scanning.
- Commercial Solutions: SolarWinds, ManageEngine, or Qualys for enterprise-grade features.
- Cloud-Native Tools: AWS Config, Azure Asset Management, or Google Cloud Asset Inventory for cloud environments.
Key Features to Look For:
- Active and passive scanning capabilities.
- Integration with existing IT and security systems.
- Real-time or scheduled discovery.
- Reporting and visualization for asset tracking.
Example: Small internal network? Start with Nmap to scan your IP ranges and get a quick view of what’s online.
Step 3: Configure Your Network for Discovery
Prepare your network to ensure accurate and secure scanning:
- Map Your Network: Identify IP ranges, subnets, and VLANs to scan.
- Set Permissions: Ensure the discovery tool has appropriate access (e.g., SNMP credentials, API tokens for cloud services).
- Enable Protocols: Activate protocols like ICMP, SNMP, or WMI for device communication.
- Segment Scans: For large networks, scan segments to avoid performance issues.
⚠️ Caution: Avoid scanning sensitive systems without approval to prevent disruptions.
Step 4: Use Active and Passive Scanning
This is where the real magic starts. Once your network’s prepped, it’s time to discover every asset on your network automatically — and the secret sauce is using both active and passive scanning.
- Active Scanning: Tools like Nmap send probes to devices to identify IP addresses, hostnames, OS types, and open ports.
-
- Example Command: nmap -sP 192.168.1.0/24 for a ping scan.
- Passive Scanning: Tools like PRTG or Zeek monitor network traffic to detect devices without direct interaction, ideal for sensitive environments.
Best Practice: Combine both methods for comprehensive coverage. Active scans provide depth, while passive scans minimize network impact.
(And yes — AssetLoom is built to use the best of both worlds, automatically. No config files, no command line gymnastics.)
Step 5: Integrate with a Centralized Inventory
Once you've scanned, you’ll have a mountain of data. Now what?
Don’t just leave it in a spreadsheet. You want that info in a centralized, structured place where it stays fresh and useful — like:
- A CMDB (Configuration Management Database) — e.g., ServiceNow, BMC
- An IT asset platform — like Lansweeper or (you guessed it) AssetLoom
- A SIEM tool — e.g., Splunk, for security-focused tracking
What to do:
- Import your scan data (CSV, JSON, API — whatever works)
- Group assets by type, location, criticality, owner, etc.
- Set up automatic updates so the info stays accurate
Because stale asset data? That’s just a liability.
🗓️ Step 6: Schedule Regular Scans
Running one scan is a great start — but assets change all the time. Devices get added, removed, renamed, moved, reconfigured. If you’re not scanning regularly, you’re falling behind.
The fix? Set it and forget it.
How to automate it:
- Daily, weekly, or monthly scans — depends on how often your environment changes
- Event-based scans — trigger a scan when something new connects to the network
- Rogue device alerts — get notified when something unexpected shows up
Bonus points:
- Sync results automatically to your CMDB or asset tracker
- Set up notifications or reports for your team
- Schedule downtime windows for scanning sensitive environments
Example: Tools like SolarWinds let you schedule scans and send auto-reports. Or AssetLoom makes this easy with built-in scheduling and smart automation. No scripting. No babysitting.
Because let’s be honest — no one wants to remember “scan day.”
🧹 Step 7: Validate and Refine the Results
Even the best tools can give you messy data. Before you trust it blindly, do a quick cleanup:
- Cross-check with your existing records
- Merge duplicates (hello, multi-IP devices)
- Tag assets with owner, location, or purpose
- Filter out noise (not every ping is worth tracking)
Clean data means fewer headaches later — for reports, audits, or just staying sane.
💡 Quick tip: Use visual tools to spot oddities fast (Grafana dashboards work great).
🔒 Step 8: Maintain and Secure Your Discovery Process
You’ve set everything up — now don’t let it rot. Asset discovery isn’t a “one and done” deal. Keep it tight with a little ongoing TLC:
Keep it maintained:
- Update your tools regularly (vulnerabilities are a thing)
- Limit access to scan configs and results
- Monitor performance so scans don’t slow the network
- Document everything — scan schedules, settings, what you’re tracking
This stuff keeps your discovery reliable and your IT team out of fire-drill mode.
Bonus: When audits or incidents happen, you’ll have clean, up-to-date records ready to go.
Common Pitfalls to Avoid
Even with automation, there are a few traps that can mess up your asset discovery. Don’t fall for these:
- Only scanning desktops: Your laptops aren’t the whole network. Don’t ignore mobile devices, IoT gear, cloud resources, or printers hiding in plain sight.
- Forgetting to update credentials: Scans will fail if your tool can’t log in. Rotate and update SNMP, API tokens, SSH keys, whatever your environment uses.
- Skipping the follow-up: Discovery is just the first step. If you don’t act on what you find, what’s the point? Unpatched software? Unknown devices? Take action before they become incidents.
Avoid these, and you’re already ahead of the game.
Conclusion
Getting full visibility doesn’t have to be a hassle. With a clear plan, the right tools, and a bit of automation, you can discover every asset on your network automatically — and keep it that way.
Quick recap:
- Define what you want to find
- Choose a tool that fits
- Prep your network
- Use both active and passive scans
- Centralize the data
- Automate your scans
- Clean up the results
- Avoid common pitfalls
Whether you're starting with open source tools or looking to streamline the whole thing, the key is consistency. And if you want to make it even easier?
=> Related blog: What is IT Asset Management (ITAM)?

Subscribe for Expert Tips and Updates
Receive the latest news from AssetLoom. right in your inbox


