How SharePoint Powers Microsoft IT Asset Management?
Learn how SharePoint fits into Microsoft IT Asset Management, its strengths and limitations, and how tools like AssetLoom can enhance your ITAM strategy.
Managing IT assets is a top priority for any organization that relies on technology. Within the Microsoft ecosystem, there are several tools that help with IT Asset Management (ITAM), and SharePoint is one of the most accessible starting points.
Microsoft IT Asset Management isn’t about a single tool, it’s about how Microsoft services like SharePoint, Intune, Configuration Manager, and Azure Active Directory work together to track and manage IT resources. SharePoint plays a unique role in this mix: it offers a flexible, user-friendly way to organize asset data, create custom tracking lists, and automate workflows.
For organizations already using Microsoft 365, using SharePoint for ITAM can be a practical, cost-effective solution especially when paired with the right structure and integrations.
In this blog, we’ll explore how SharePoint supports Microsoft IT Asset Management, how to set it up, what its limitations are, and how to make it even more powerful with dedicated ITAM tools.
What Makes SharePoint a Viable Platform for IT Asset Management?
Microsoft SharePoint has emerged as a surprisingly powerful contender in the realm of IT Asset Management (ITAM), offering a blend of flexibility, integration, and cost-effectiveness that makes it a viable alternative to traditional ITAM tools. While it’s not a dedicated asset management solution out of the box, SharePoint’s features align perfectly with the needs of organizations looking to track hardware, software, and digital assets within the Microsoft ecosystem. Here’s what sets SharePoint apart as a practical ITAM platform:
1. Seamless Integration with Microsoft 365
SharePoint’s native integration with Microsoft 365 tools like Teams, Power Automate, and Excel makes it a natural fit for ITAM. You can sync asset data with user directories, automate notifications, or pull reports without leaving the Microsoft environment. This cohesion reduces complexity and leverages tools your team already uses, enhancing adoption and efficiency.
2. Cost Efficiency for Microsoft Users
For organizations subscribed to Microsoft 365, SharePoint comes at no additional cost a major advantage over standalone ITAM software that often requires separate licensing fees. This built-in availability makes it an economical choice, especially for small to medium-sized businesses aiming to maximize existing investments.
3. Customization to Fit Any ITAM Need
Unlike rigid, purpose-built ITAM platforms, SharePoint offers unparalleled customization. Its lists and libraries can be tailored to track anything from laptops to software licenses, with custom columns for details like serial numbers, warranty dates, or assigned users. This adaptability ensures SharePoint meets your specific asset management goals, no matter the scale.
4. Centralized Data and Collaboration
ITAM isn’t just about data it’s about teamwork. SharePoint centralizes asset information in a cloud-based hub accessible to IT, procurement, and finance teams. Real-time updates, document attachments (e.g., invoices), and permission controls foster collaboration while keeping sensitive data secure.
5. Automation and Scalability
With Power Automate integration, SharePoint automates repetitive tasks like warranty alerts or asset check-ins, saving time and reducing errors. Plus, it scales effortlessly, whether you’re managing 50 devices or 5,000, SharePoint adapts without requiring a complete overhaul, making it future-proof for growing organizations.
6. Enhanced Search and Reporting
SharePoint’s metadata and search capabilities make finding assets a breeze. Tag items with categories like “Hardware” or “Location,” and use Power BI for visual dashboards. This turns raw data into actionable insights, a critical feature for effective ITAM.
In short, SharePoint’s viability stems from its ability to combine Microsoft’s ecosystem strengths with practical, customizable features all at a lower entry cost than many competitors. It’s not just a document platform; it’s a dynamic ITAM solution waiting to be unleashed.
Key Ways SharePoint Supports ITAM
SharePoint transforms IT Asset Management (ITAM) by leveraging its robust features to streamline processes and enhance visibility. It integrates seamlessly with Microsoft’s ecosystem, making it a practical choice for tracking hardware, software, and digital assets. Here are the 6 main ways SharePoint supports ITAM effectively.
1. Centralized Asset Repository
SharePoint makes it easy to build a central database for all your IT assets. Using custom lists, you can create records for hardware, software, licenses, and more. Each entry can include key details like asset type and model, serial numbers, purchase and warranty dates, assigned user or department, and vendor and contract information. This centralization helps reduce scattered spreadsheets and disconnected records, providing a single, reliable hub for ITAM that’s accessible across teams.
2. Custom Fields and Views
You can tailor SharePoint lists with custom fields that match your asset tracking needs. Need to sort assets by location, cost center, or lease expiration? SharePoint lets you add these fields and save different views for different users, such as IT admins or finance teams. For example, IT might view assets by maintenance schedules, while finance focuses on purchase costs. This flexibility ensures your ITAM system adapts to your organization’s unique requirements.
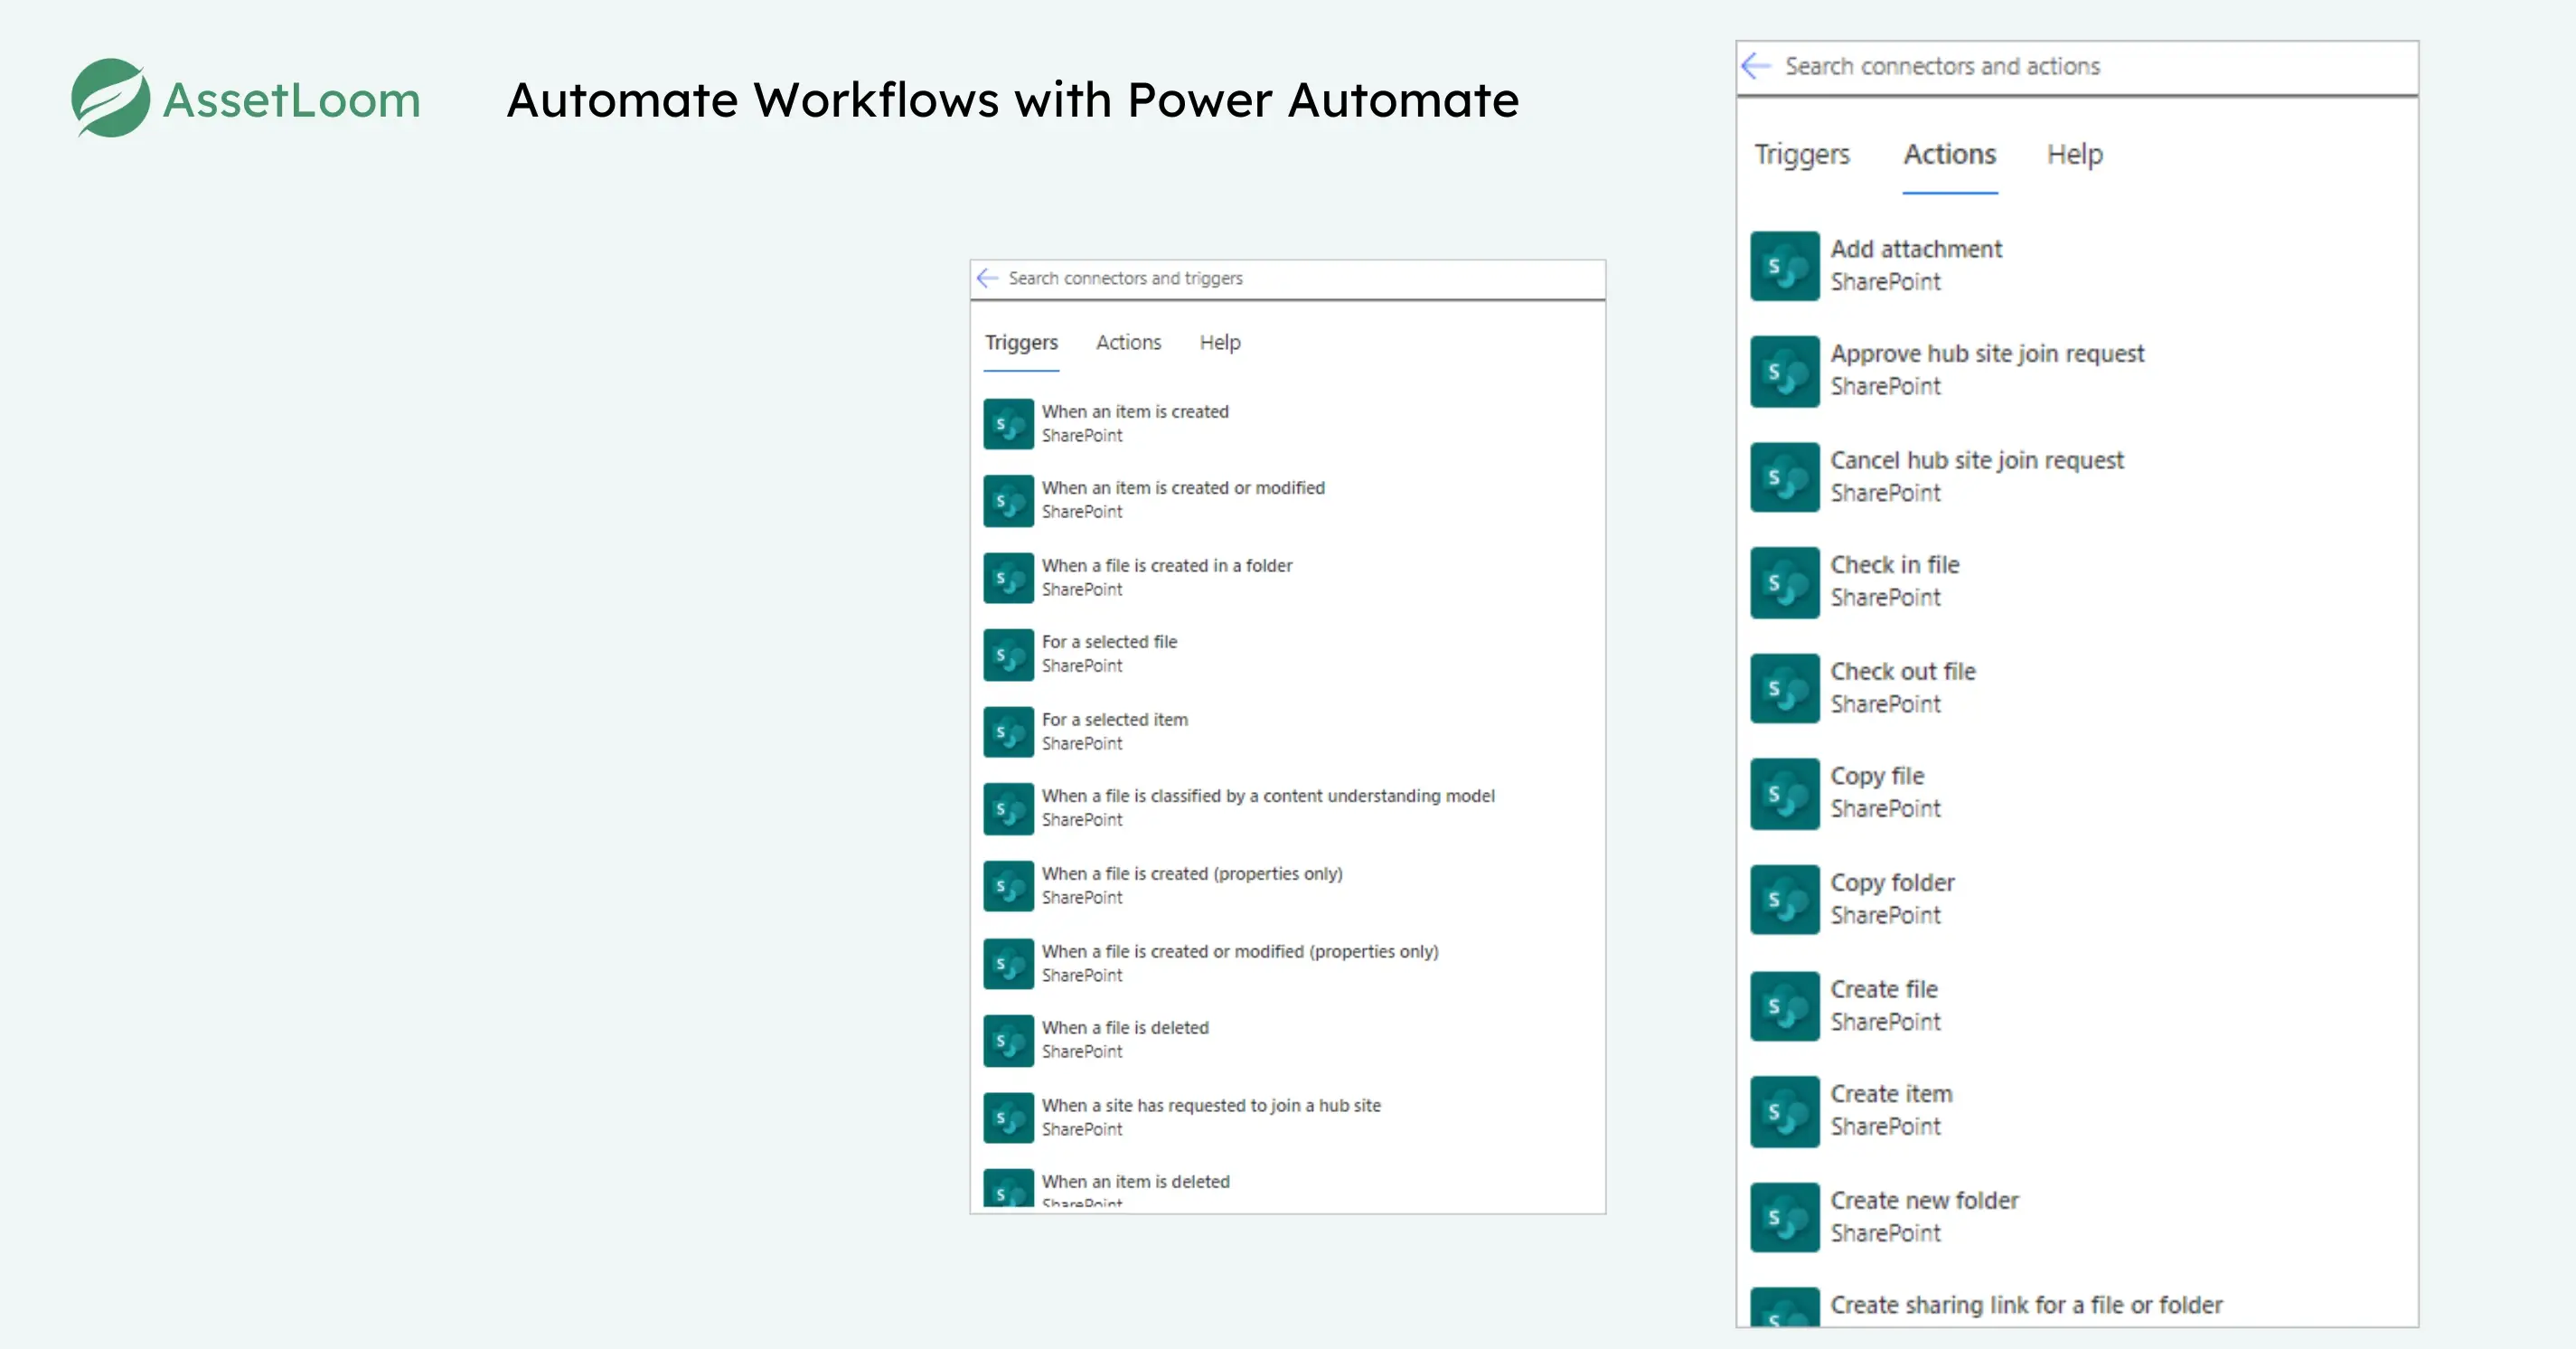
3. Workflow Automation with Power Automate
SharePoint integrates with Power Automate, which means you can automate tasks to streamline ITAM. Set up flows for sending alerts when warranties are close to expiring, notifying teams when an asset is checked in or out, or updating asset status based on conditions like disposal or maintenance. This reduces manual effort and helps teams stay on top of asset lifecycles, ensuring nothing slips through the cracks.
4. Document Attachment and History Tracking
Every asset record in SharePoint can have files attached, such as invoices, user manuals, or compliance certificates. You can upload a laptop’s warranty document directly to its list entry for quick access. Plus, SharePoint maintains version history, so you can track changes over time and see who updated what. This feature supports audits and accountability, keeping your ITAM data transparent and organized.
5. User Mapping Through Active Directory
When integrated with Azure Active Directory, SharePoint can help map assets to specific users. This makes it easier to assign devices, track responsibility, and manage onboarding or offboarding more effectively. For instance, link a desktop to an employee’s profile, and when they leave, update the record to reflect reassignment. This integration enhances accuracy and simplifies user-related asset management.
6. Reporting and Dashboards via Power BI
While SharePoint alone doesn’t offer detailed analytics, the data stored in lists can be pulled into Power BI to create dashboards and reports. This gives leadership and IT teams a clearer picture of asset distribution, costs, and performance over time. Build visuals showing total hardware value or license expiration trends, then embed them on a SharePoint page for real-time insights that drive smarter ITAM decisions.
How To Use SharePoint For IT Asset Management
SharePoint offers a powerful platform for IT Asset Management (ITAM), allowing you to track hardware, software, and licenses efficiently within the Microsoft 365 ecosystem. By using pre-built templates and adding custom features, you can create a robust ITAM system with minimal setup. This guide walks you through how to use SharePoint for ITAM, from setting up an asset list to automating workflows with Power Automate. Whether you’re an IT admin or a business leader, these steps will help you build a centralized, actionable ITAM solution.
Step 1: Create an Asset List with the Asset Manager Template
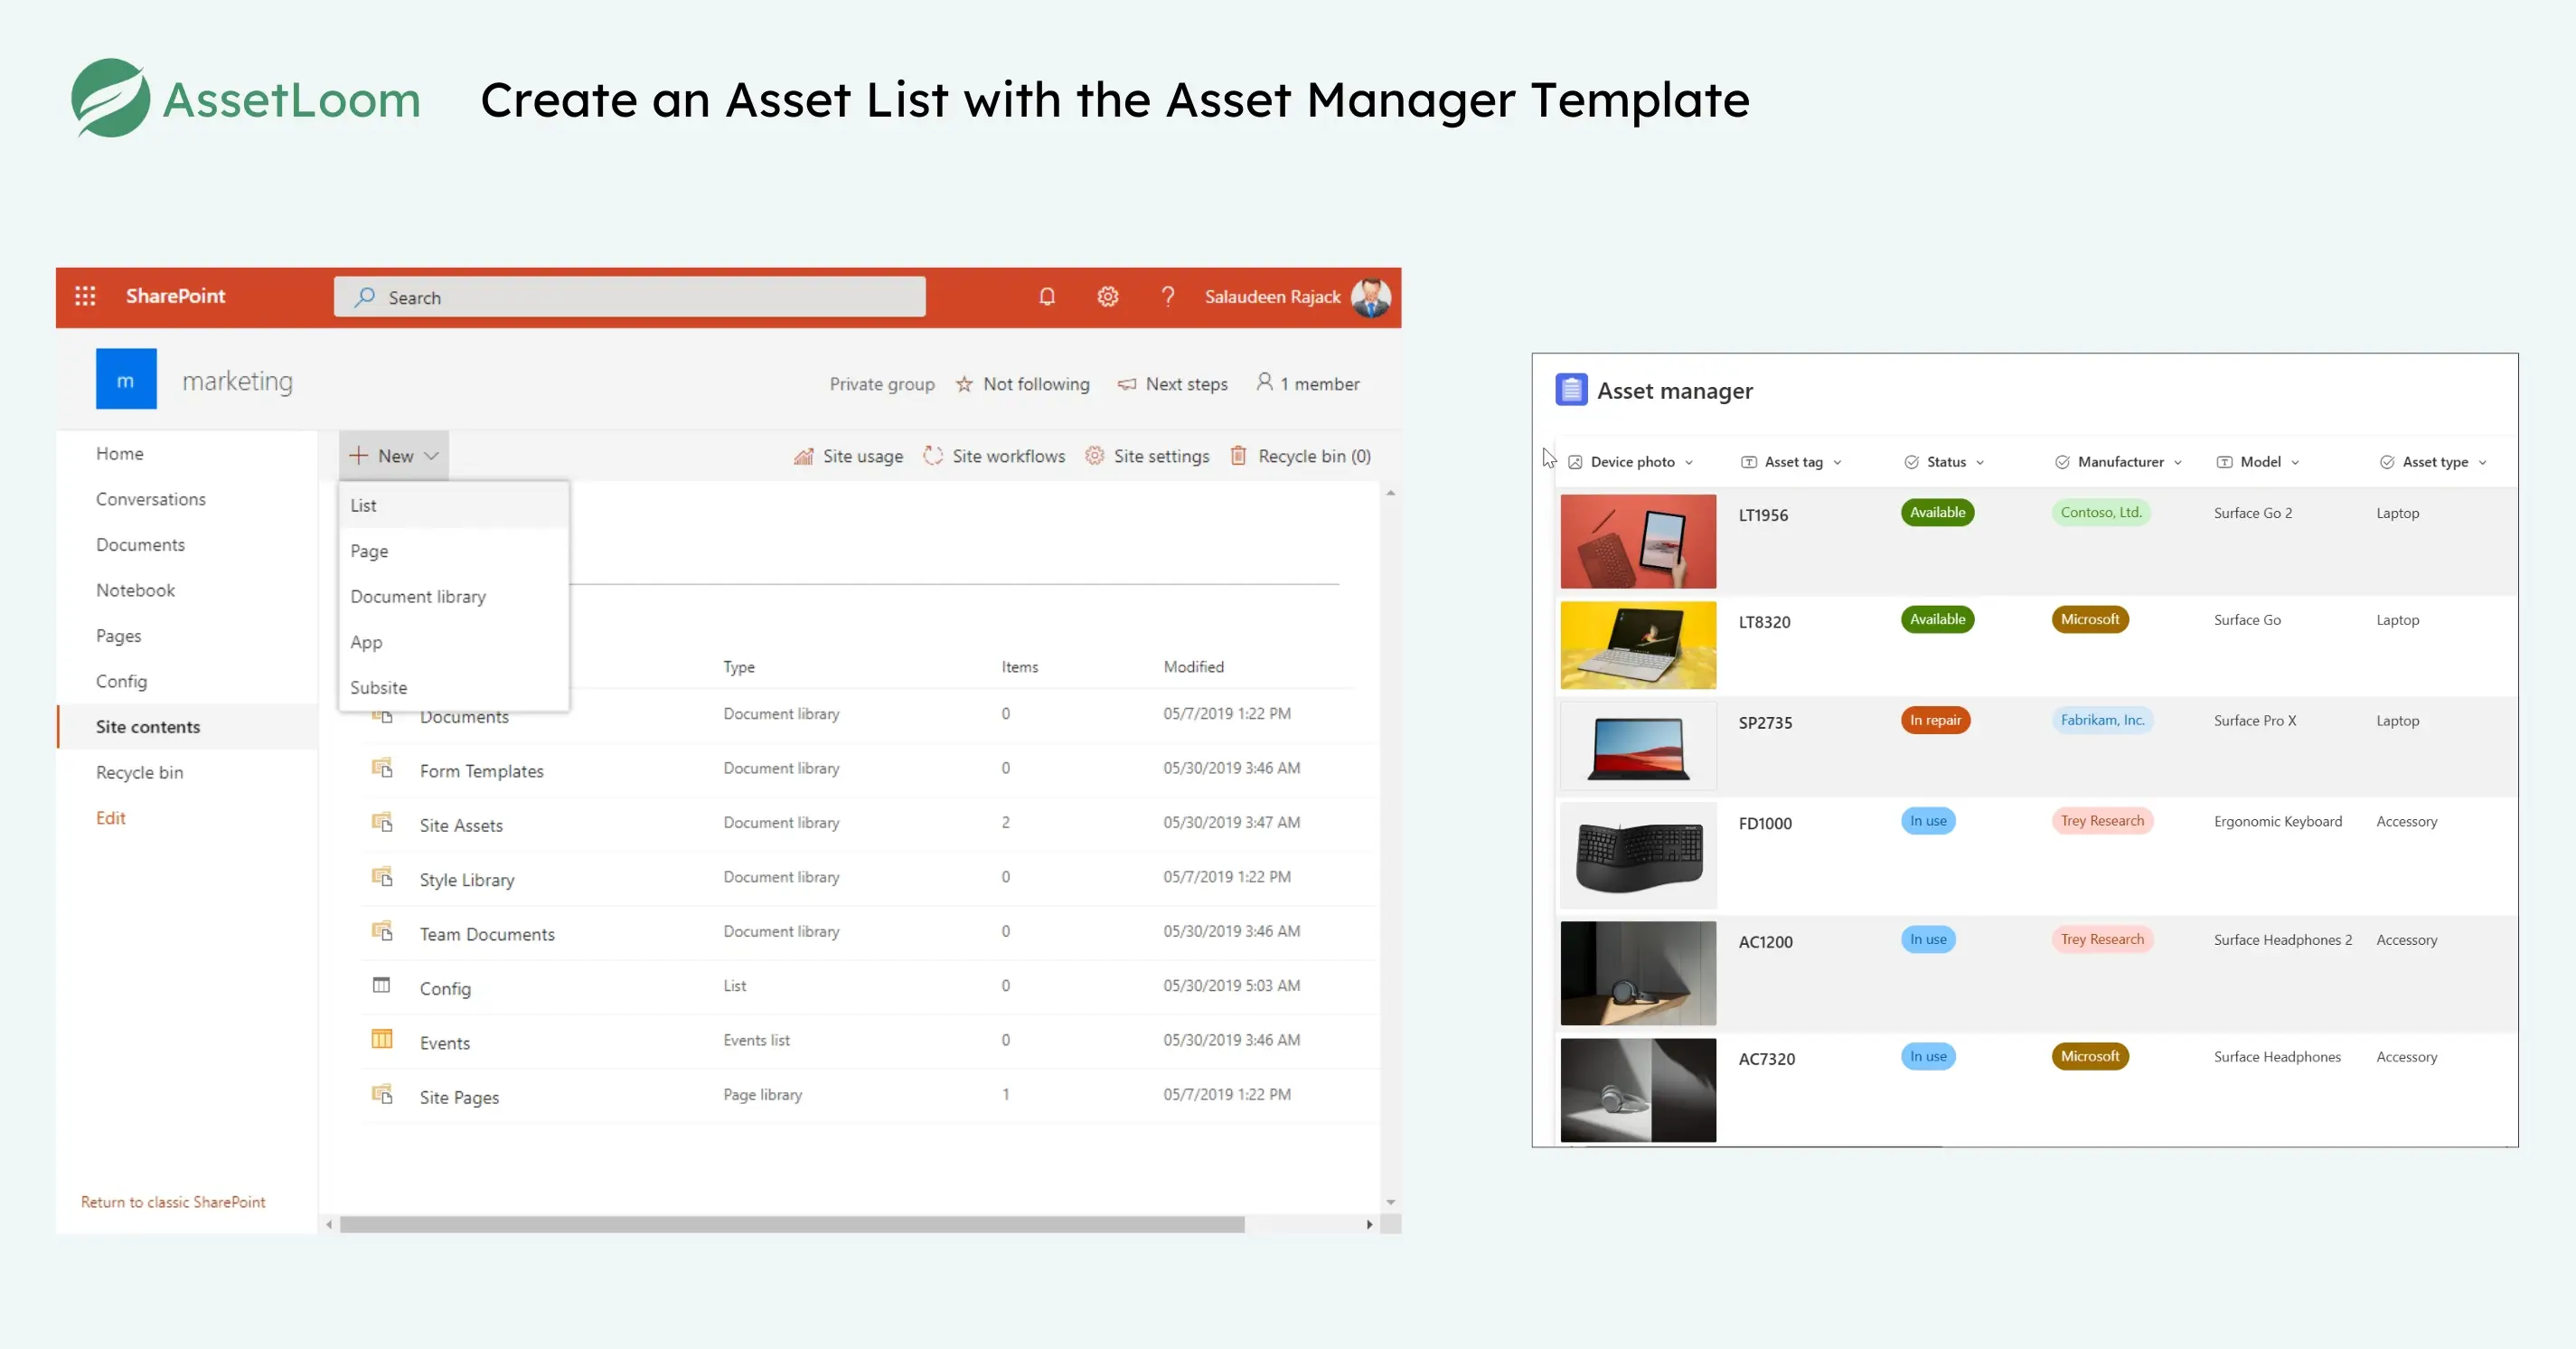
SharePoint’s pre-built “Asset Manager” template is a quick way to start your ITAM system. It comes with essential columns to track assets right out of the box. Here’s how to set it up:
- Navigate to Your SharePoint Site: Log into Microsoft 365, go to SharePoint, and open your desired site (e.g., a Team site named “IT Asset Hub”).
- Access Site Contents: Click Settings, then select Site Contents.
- Add a New List: Click + New > List, and choose From an existing template.
- Select the Asset Manager Template: Scroll to the “Asset Manager” template, click it, and hit Create. This adds the list to your site.
- Review Default Columns: The template includes fields like:
- Asset name or type.
- Serial number.
- Purchase date.
- Assigned user.
- Status.
- …….
Source: Microsoft List templates
This template gets you up and running fast, providing a foundation you can customize for your ITAM needs. Populate it with initial asset data manually or import from Excel.
Step 2: Add Custom Columns for Detailed Tracking
The “Asset Manager” template is a great start, but your ITAM system might need more granularity. Add custom columns to capture specific details. Here’s how, with suggested additions:
- Go to List Settings: Open your “IT Assets” list, click List Settings, and select Create Column.
- Add These Columns:
- Warranty Date: A date field to track when warranties expire. This helps you plan replacements.
- Next Maintenance Due: A date field for scheduling upkeep, like router servicing, to avoid missed maintenance.
- Order Invoice: A file field to upload purchase invoices or images, keeping financial records handy.
- Vendor: A text field for vendor names, with an optional second column for contact numbers.
- Office/Location: A choice or text field to note where assets are (e.g., “HQ,” “Remote”).
- Department: A text or lookup field to link assets to departments (e.g., “Marketing,” “IT”).
- Save and Test: Add the columns, then test by entering sample data to ensure they work as expected.
These additions make your list comprehensive, covering the full lifecycle of your IT assets. Adjust field types (e.g., text, date, file) based on your tracking needs.
Step 3: Set Up Custom Views for Quick Access
Custom views let you filter and display asset data for different teams without scrolling through every column. Here’s how to create them:
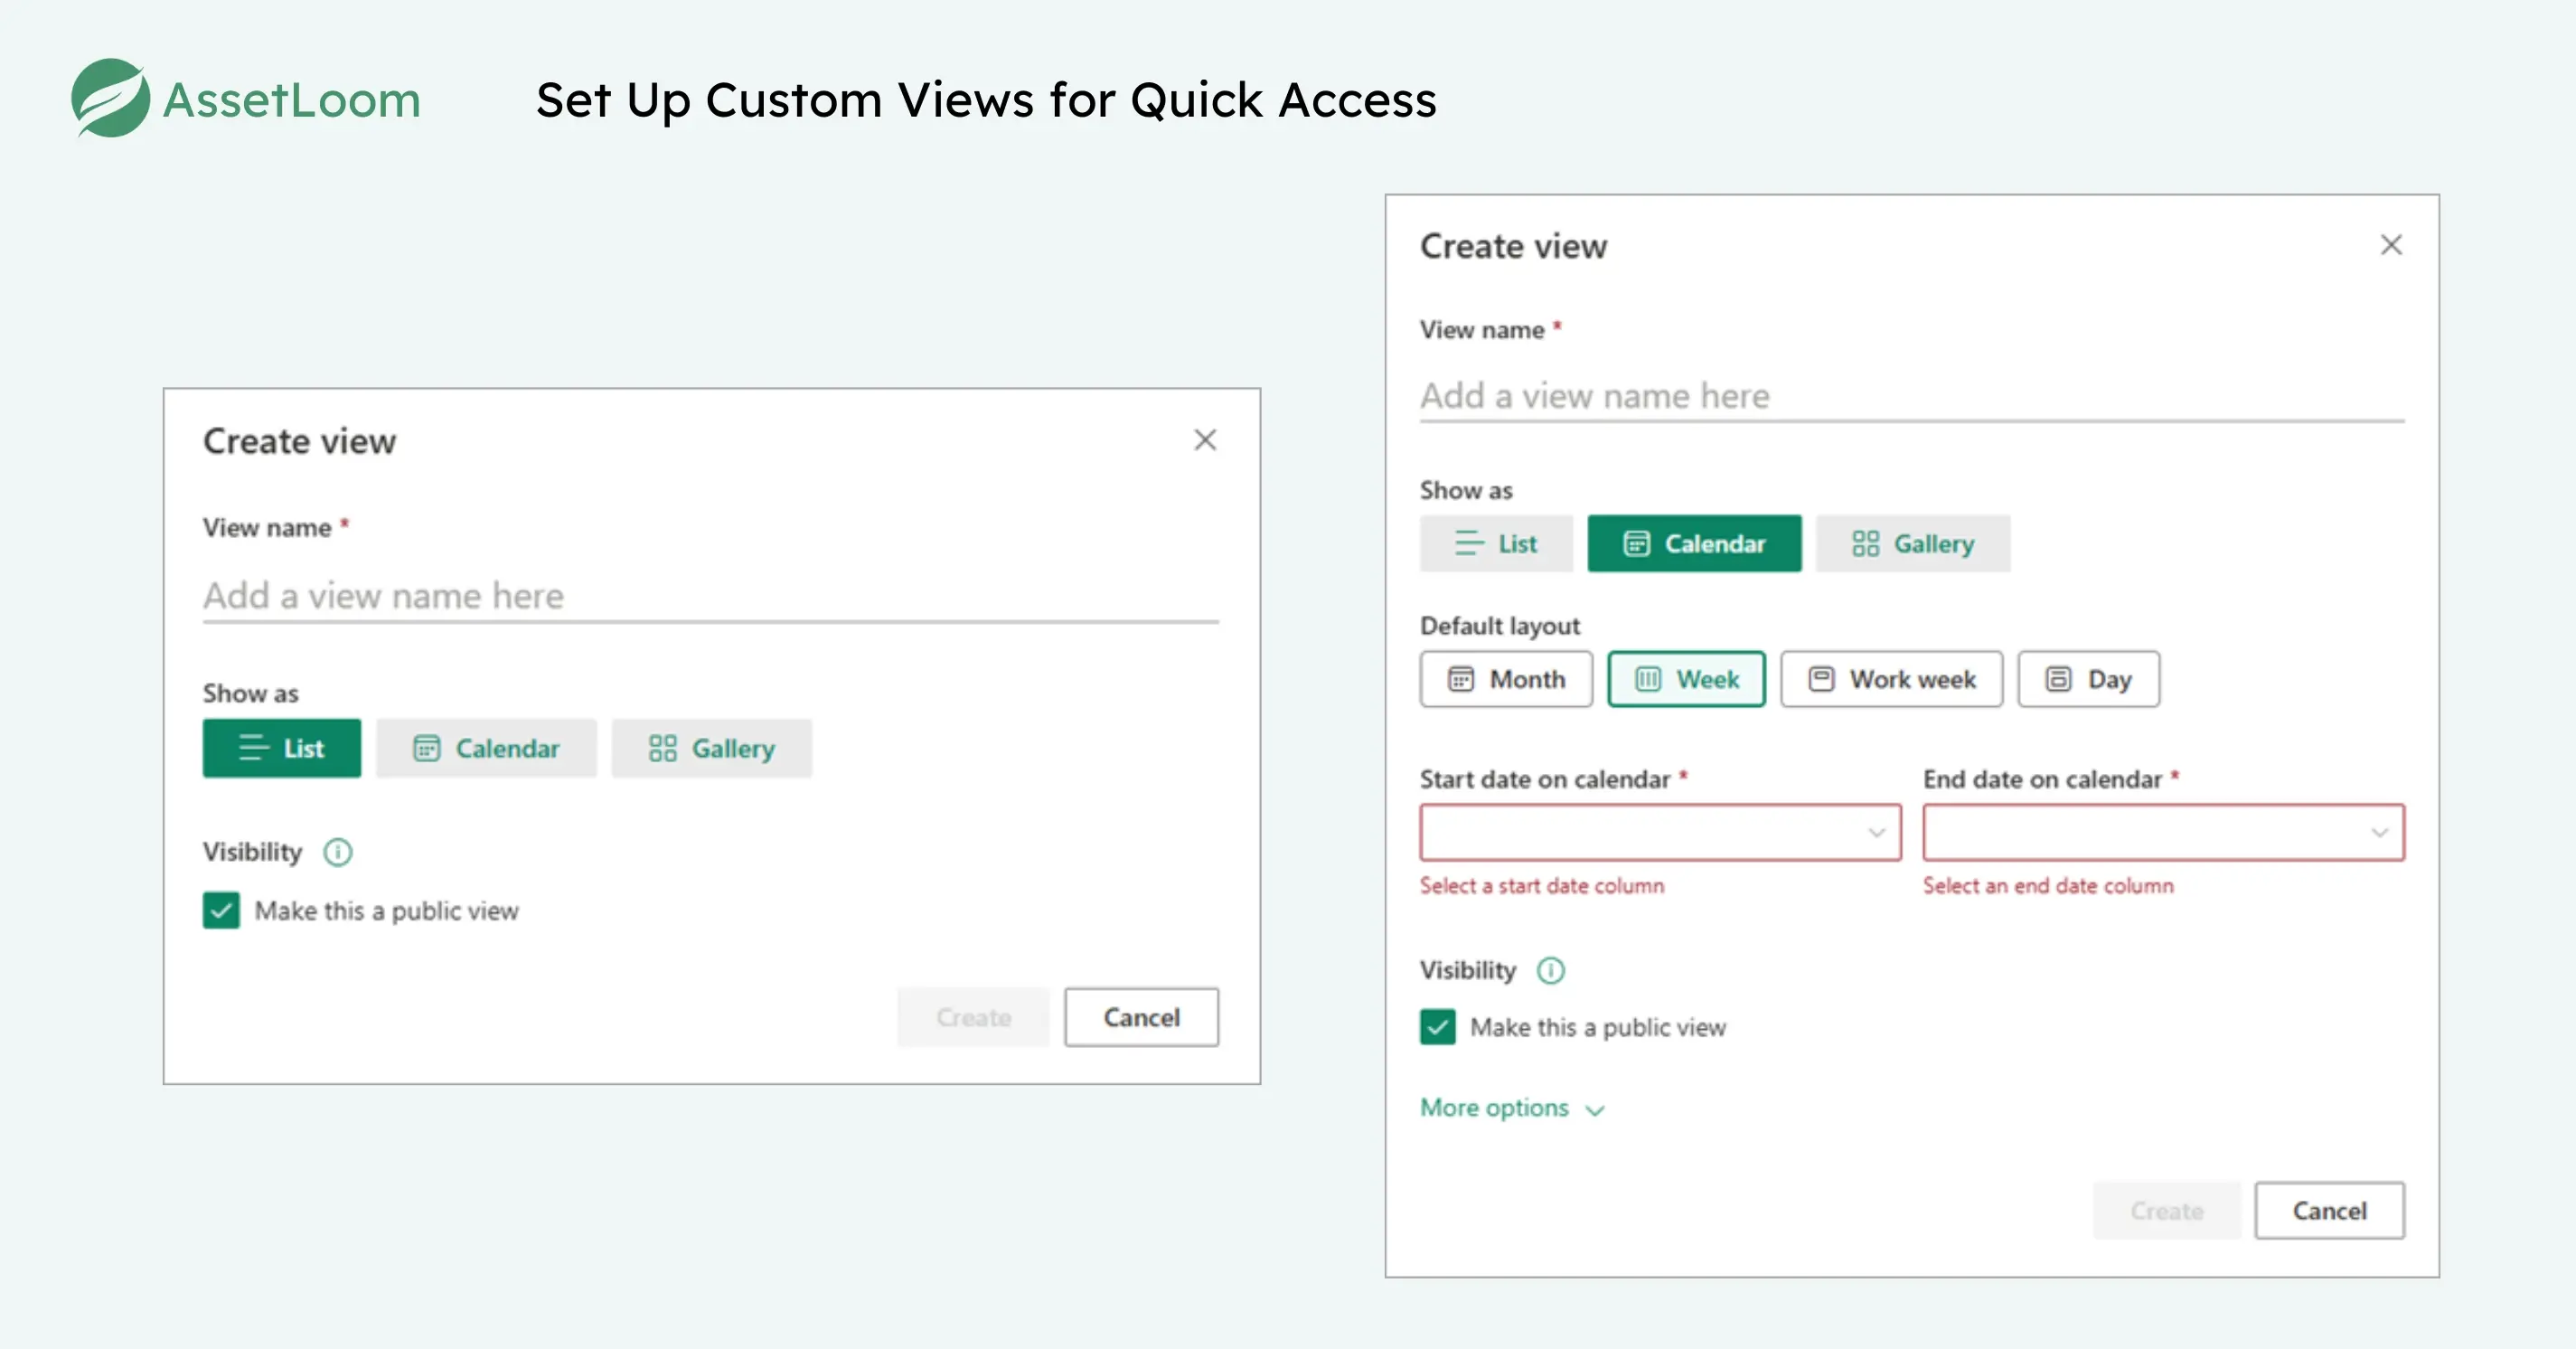
- Access Views: In your asset list, go to List Settings > Create view.
- Define Views: Select Standard View and name it. Examples include:
- Upcoming Maintenance: Filter by “Next Maintenance Due” within 30 days, sorted by date.
- Vendor List: Show only “Vendor” and “Vendor Contact” columns for procurement.
- Warranty Expirations: Filter “Warranty Date” for assets expiring within 60 days, sorted ascending.
- Customize Columns and Filters: Choose which columns to display and set filters (e.g., “Warranty Date < [Today]+60”).
- Assign Permissions: Set views as defaults for specific groups via permissions (e.g., IT sees all, finance sees costs).
Custom views save time and tailor the ITAM experience, ensuring each team gets the data they need instantly.
Step 4: Attach Documents and Track History
Link supporting files to assets and maintain a change log with SharePoint’s document features. Here’s the process:
- Enable Attachments: In List Settings, ensure “Attachments” are enabled for your list.
- Upload Files: For each asset, click the item, select Attach File, and upload documents like invoices or manuals.
- Alternative Library Option: Create a separate Document Library via + New > Document Library, then use a lookup column in your list to link files.
- Enable Versioning: Go to List Settings > Versioning Settings and turn on version history to track edits (e.g., who changed the status and when).
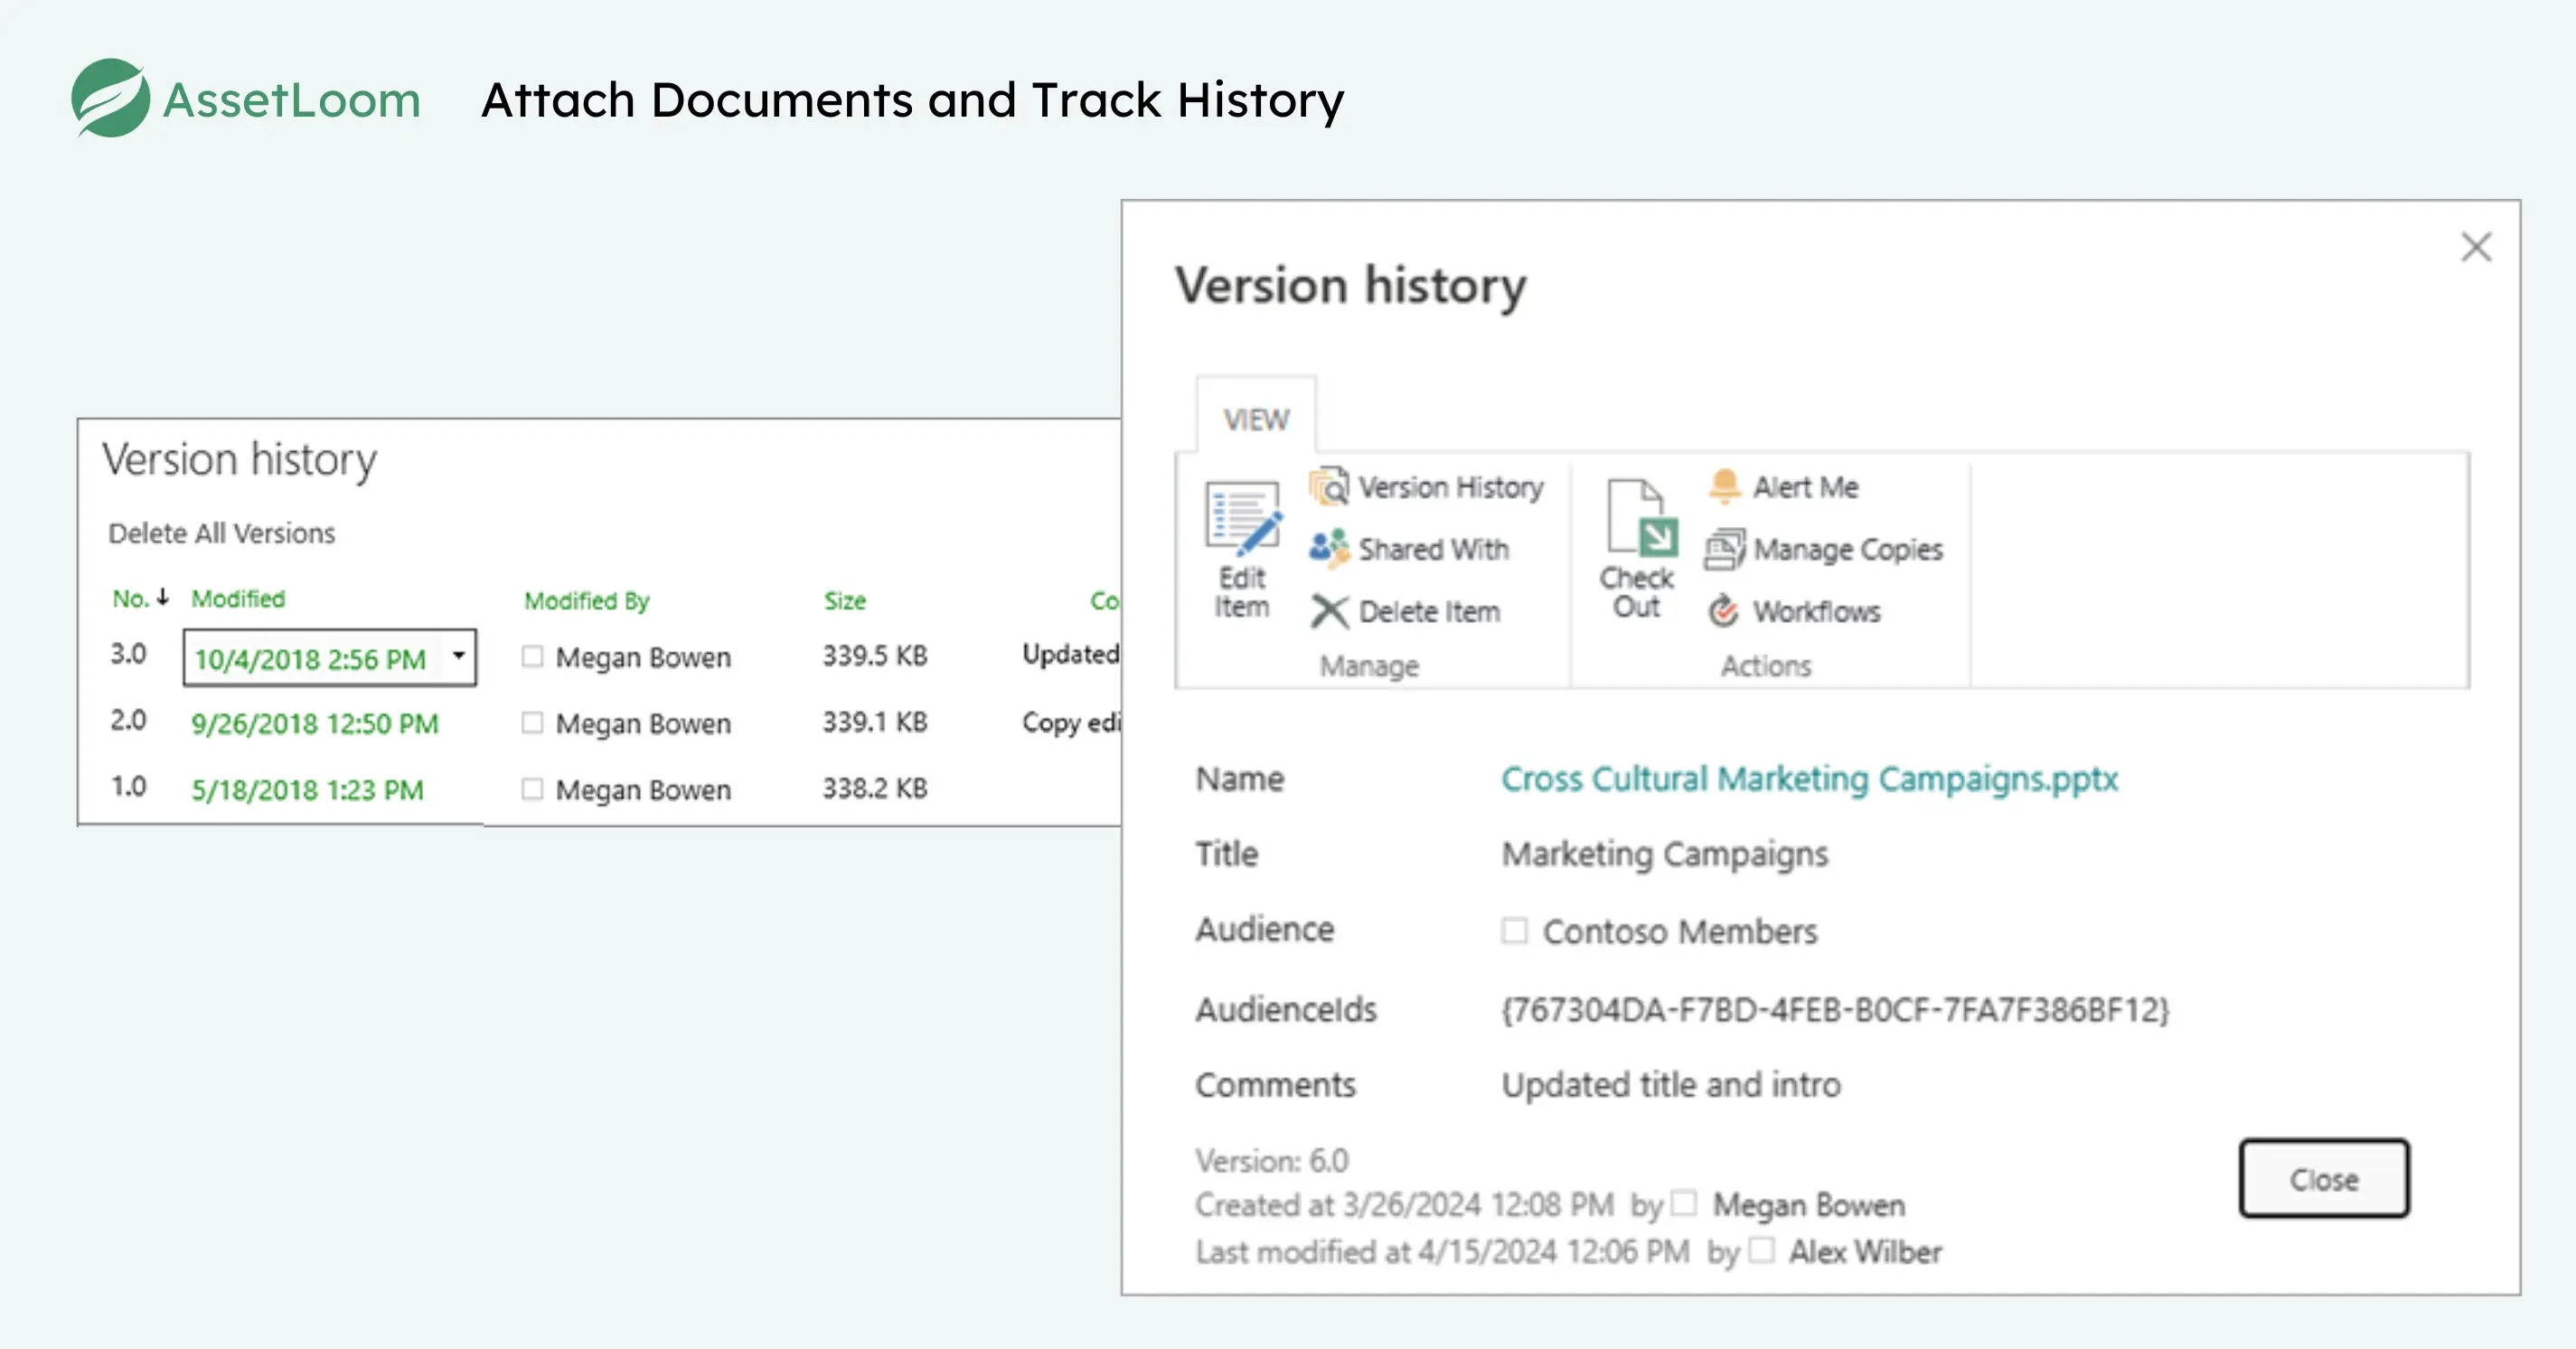
This keeps asset records complete and auditable, with all files and updates in one place.
Step 5: Automate Workflows with Power Automate
Power Automate reduces manual ITAM work by automating tasks. Here’s how to set up key workflows:
- Access Power Automate: From your asset list, click Automate > Power Automate > Create a flow.
- Configure These Workflows:
-
Warranty Expiry Tracking:
- Purpose: Alert your team about nearing warranty expirations.
- Trigger: Run every Monday.
- Action: Get items from the SharePoint list.
- Condition: Check if “Warranty Date” is within 30 days of today.
- If True: Post a message in Microsoft Teams with asset details.
-
Asset List Changes:
- Purpose: Notify teams of updates.
- Trigger: When an item is added or modified.
- Action: Post a message in Teams with title, modified by, and date.
-
Recurring Maintenance:
- Purpose: Flag devices due for maintenance.
- Trigger: Run every Monday.
- Action: Get items from the list.
- Condition: “Next Maintenance Due” within 3 days.
- If True: Send a Teams message or create a helpdesk ticket via webhook.
-
Barcode Scanning Addition:
- Purpose: Add assets via Power Apps barcode scanning.
- Trigger: Scan a barcode in Power Apps.
- Action: Create a new list item with details like name, serial number, and type.
- Condition: Let users choose to scan multiple barcodes in one session.
- If Scanned: Play a beep or vibrate for confirmation.
- Test and Deploy: Test each flow with sample data, then save for ongoing use.
These automations keep your ITAM system proactive, cutting down on repetitive tasks.
This step provides a visual overview, helping you monitor ITAM trends and plan ahead.
Limitations of Using SharePoint Alone for ITAM
While SharePoint can handle the basics of IT asset tracking, it quickly runs into limitations as asset volume and complexity grow. It wasn’t designed to manage the full lifecycle of IT assets or provide deep visibility into things like usage history, maintenance logs, or compliance data. As your IT environment scales, managing long lists and keeping data up to date becomes time-consuming and error-prone. That’s where a specialized tool like AssetLoom makes a difference. Built for modern IT teams, AssetLoom helps you go beyond manual tracking by automating asset lifecycles, connecting assets with service records, and generating reports with ease. It’s a smarter way to manage IT assets fully scalable, audit-ready, and ready to work alongside your Microsoft tools.
Conclusion
SharePoint offers a flexible starting point for IT asset management, especially for teams already working within the Microsoft 365 ecosystem. It’s useful for organizing asset data, setting up basic tracking, and creating custom workflows. But as asset needs grow, relying on SharePoint alone can lead to gaps in visibility, manual effort, and missed opportunities for automation.
That’s where a purpose-built ITAM solution like AssetLoom adds real value. By combining SharePoint’s collaborative features with AssetLoom’s specialized asset tracking, lifecycle management, and reporting capabilities, you get a complete, scalable approach to managing IT assets across your organization.
Ready to take your Microsoft IT asset management to the next level? Book a demo to see how AssetLoom fits right into your workflow.

Related Blogs
Subscribe for Expert Tips and Updates
Receive the latest news from AssetLoom, right in your inbox.
