How to Build an Asset Lifecycle Workflow That Works
Learn how to build and maintain an efficient asset lifecycle workflow. Discover best practices, key steps, and how tools like AssetLoom can streamline asset management for long-term success.
Managing an asset lifecycle might not sound like the most exciting part of your job, but it’s one of the most important. When done right, it’s the backbone of smooth operations, cost savings, and risk management. But when it's disorganized or incomplete, it can lead to inefficiencies, compliance issues, and unexpected costs all things you definitely don’t want on your plate.
So, how do you create an asset lifecycle workflow that works for you and your team? The key is in standardizing and documenting the entire process, from acquisition all the way through to retirement.
In this guide, we’ll walk through a straightforward approach to building a clear, actionable asset lifecycle workflow. Whether you're dealing with IT hardware, software, or any other type of asset, this is a plan that’ll help ensure things are running smoothly, costs are kept under control, and your team stays on track.
Understanding the Asset Lifecycle
Managing an asset isn't just about keeping track of it. It's about understanding its journey from start to finish. The asset lifecycle is the roadmap that guides each asset through its time in your organization, ensuring it delivers value, stays compliant, and doesn't become a hidden risk.
What Is an Asset Lifecycle?
Think of the asset lifecycle as the full story of an asset's time with your company. It starts when you acquire it and ends when it's no longer needed. Here's a breakdown of the typical stages:
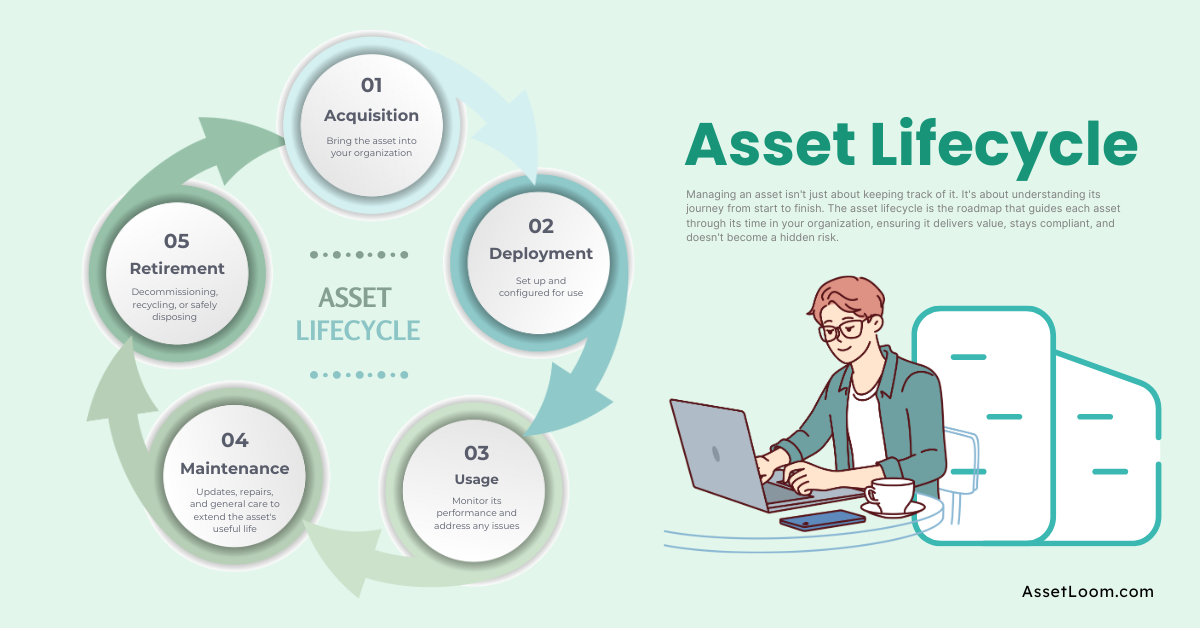
- Acquisition: This is when you bring the asset into your organization. It could be a new laptop, a software license, or any other piece of equipment or tool that your team will use.
- Deployment: Once acquired, the asset needs to be set up and configured for use. This includes installation, tagging, and ensuring it's ready for action.
- Usage: During this stage, the asset is actively used by your team. It's important to monitor its performance and address any issues that arise.
- Maintenance: Regular upkeep is essential to keep assets functioning properly. This includes updates, repairs, and general care to extend the asset's useful life.
- Retirement: When the asset is no longer needed or has reached the end of its useful life, it's retired. This could mean decommissioning, recycling, or safely disposing of it.
Each of these stages requires attention and proper management to ensure the asset continues to serve its purpose effectively.
=> What Is IT Asset Lifecycle Management?
Why Standardizing the Lifecycle Matters
Standardizing the asset lifecycle isn't just about creating a process; it's about creating a reliable system that works for your team. Here's why it matters:
- Clarity: With a clear, standardized process, everyone knows what to do and when to do it. This reduces confusion and ensures consistency across the organization.
- Efficiency: A streamlined workflow eliminates unnecessary steps and bottlenecks, allowing your team to focus on what matters most.
- Cost Control: By managing assets effectively, you can avoid unnecessary purchases, extend the life of existing assets, and make informed decisions about replacements.
- Compliance: A standardized process helps ensure that all regulatory requirements are met, reducing the risk of legal issues.
- Risk Management: Properly managing the asset lifecycle helps identify and mitigate potential risks before they become problems.
Challenges in Managing the Asset Lifecycle
While the benefits are clear, managing the asset lifecycle comes with its challenges:
- Inconsistent Processes: Without a standardized approach, different teams may handle assets in various ways, leading to confusion and inefficiencies.
- Lack of Visibility: Without proper tracking, it's easy to lose sight of where assets are, who has them, and their condition.
- Manual Tracking: Relying on spreadsheets or other manual methods can lead to errors and outdated information.
- Compliance Risks: Without a clear process, it's easy to overlook regulatory requirements, leading to potential legal issues.
- Cost Overruns: Poor asset management can lead to unnecessary purchases and underutilized resources, increasing costs.
Recognizing these challenges is the first step toward overcoming them. In the next section, we'll explore how to build a standardized asset lifecycle workflow that addresses these issues and sets your team up for success.
Steps to Build a Standardized Asset Lifecycle Workflow
Now that we’ve covered the importance of the asset lifecycle and the challenges of managing it, let's get into the practical steps of building a standardized workflow. This isn’t about creating a perfect system, but about creating a reliable and repeatable process that works for your team, every time.
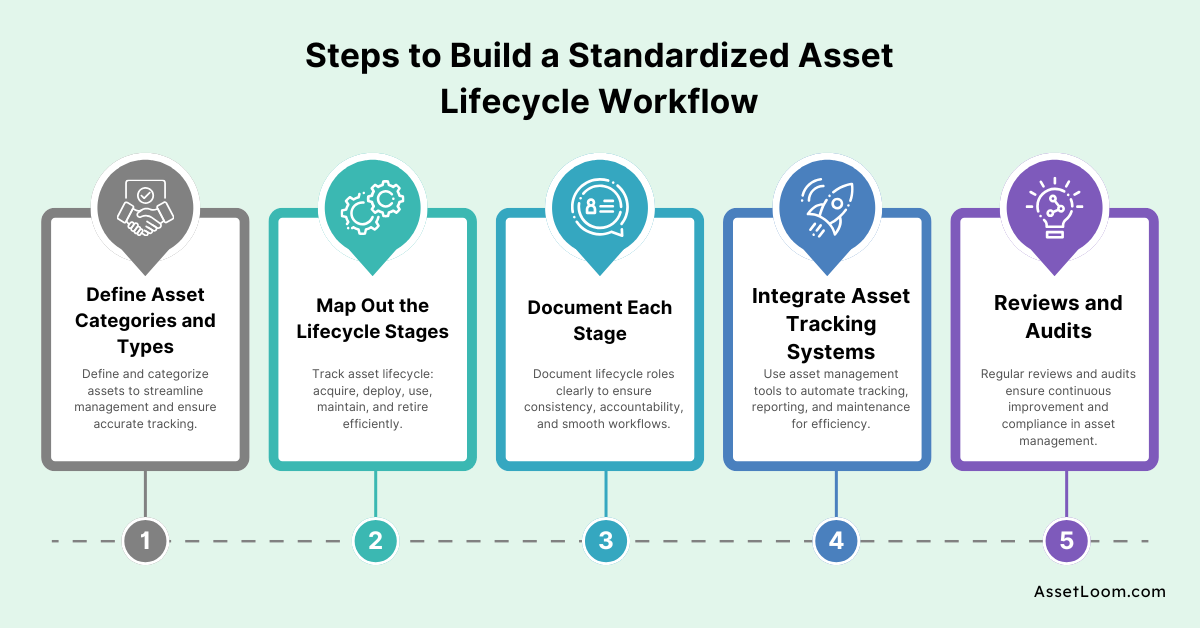
Step 1: Define Asset Categories and Types
Start by clearly defining what constitutes an asset in your organization. Not all assets are the same, and each category may require different management processes.
- Hardware Assets: Laptops, servers, network devices, etc.
- Software Assets: Licenses, subscriptions, tools, etc.
- Non-IT Assets: Furniture, vehicles, office supplies.
By categorizing assets, you can tailor your workflow to address the unique needs of each type. This also helps to prevent overlap and ensures that assets are tracked appropriately.
Step 2: Map Out the Lifecycle Stages
Once you know what types of assets you have, the next step is to figure out what happens to them at each stage of their life. This is where you break the process down into clear steps from the moment you get the asset to when it's no longer needed. This will help you stay organized and make sure nothing falls through the cracks.
Here’s how the typical lifecycle stages work:
1. Acquisition (Getting the Asset):
- This is when you first get the asset. It could be buying a new laptop, getting a software license, or receiving a new tool.
- You need to decide who is responsible for ordering the asset and making sure it’s logged into your system so you can keep track of it.
- This step is also about making sure the asset is properly documented; who bought it, when it was purchased, and where it’s going.
2. Deployment (Setting Up the Asset):
- Once you’ve acquired the asset, it needs to be set up.
- For hardware like a laptop, it’s about setting it up, connecting it to the network, and tagging it so you can track it.
- For software, it means installing it, entering the license key, and ensuring it works properly.
- This is when the asset starts to get used by your team.
3. Usage (Using the Asset):
- Now the asset is being used by your team. It’s either sitting at a desk or running in the background, helping people do their jobs.
- During this time, it’s important to keep track of how well it’s working. Is it still functioning as expected, or does it need any attention?
- You also want to know who is using the asset and how much it’s being used. This helps you make decisions later, like when to upgrade or replace it.
4. Maintenance (Taking Care of the Asset):
- Just like anything else, assets need to be maintained.
- This could mean installing updates for software, fixing minor issues with hardware, or performing regular checks to keep everything running smoothly.
- Regular maintenance helps your assets last longer and work better. It’s a way to make sure that everything stays in good shape while it's still in use.
5. Retirement (When It’s Time to Let Go):
- Eventually, every asset reaches the end of its useful life.
- For hardware, this could mean it's too old to use or has stopped working properly. For software, it could mean the license is no longer valid, or the software is no longer supported.
- When an asset is retired, it needs to be properly decommissioned. This means securely disposing of hardware and making sure that any sensitive data is wiped. For software, it means uninstalling and canceling licenses to avoid paying for something you no longer need.
Each of these stages is important and needs to be managed properly. By following this simple path for every asset, you can keep everything organized and running smoothly.
Step 3: Document Each Stage with Clear Roles and Responsibilities
A critical part of building a standardized workflow is documenting each stage of the lifecycle with clear roles and responsibilities. This isn’t just about creating a flowchart; it’s about making sure everyone knows what to do, when to do it, and why.
For example:
- Procurement Team: Responsible for asset acquisition, including vendor selection and purchase approval.
- IT Operations: Handles asset deployment, configuration, and tracking within the asset management system.
- Maintenance Team: Handles software and hardware updates, patches, and repairs.
- Asset Manager: Oversees the entire lifecycle, ensuring all assets are tracked, properly maintained, and retired as needed.
This documentation helps avoid confusion and ensures consistency across the team. When roles are clearly defined, your workflow runs smoothly, and nothing slips through the cracks.
Step 4: Integrate Asset Tracking Systems (Automation Tools)
At this point, you're ready to put your plan into action. The key to efficiency here is using asset management tools to automate as much of the process as possible.
- Centralized Asset Tracking: Use an IT asset management tool like AssetLoom to track all assets in one place. This makes it easy to see the status of each asset, whether it’s in use, under maintenance, or nearing retirement.
- Automation: Automate the tracking of asset data, maintenance schedules, and even alerts for upcoming retirements. This will save your team time and ensure you never miss an important step.
- Reporting: Set up automated reporting so that you always know where your assets stand. This will give you a snapshot of the health of your asset base and highlight areas for improvement.
By integrating asset management software, you can streamline the process, reduce errors, and increase transparency.
=> 10 Reliable IT Asset Lifecycle Software Picks for 2025
Step 5: Establish Regular Reviews and Audits
A standardized workflow doesn’t mean you’re done once everything is set up. You need to monitor the system to ensure it’s working and make adjustments as needed.
- Regular Reviews: Schedule regular check-ins to evaluate how assets are being managed. Are there bottlenecks? Is there any stage of the workflow that’s consistently causing delays?
- Audits: Conduct regular audits to verify that assets are being tracked properly and are in the right condition. This is particularly important for compliance and risk management, as audits will help you identify any gaps in your process.
By building in a review and audit process, you can ensure your asset lifecycle workflow is continually improving and adapting to new challenges.
With these steps, you’ll have the foundation of a well-organized asset lifecycle workflow. The next section will cover best practices for maintaining and improving your workflow, ensuring that your asset management system keeps running smoothly in the long term.
Best Practices for Maintaining Your Asset Lifecycle Workflow
Once your asset lifecycle workflow is in place, it's important to keep it running smoothly. Here are some key best practices to ensure continuous improvement:
- Update Your Process Regularly: As your organization grows or new technologies emerge, revisit your workflow to make sure it stays relevant and effective.
- Communicate Across Teams: Regular communication between departments ensures everyone is aligned and helps avoid mistakes.
- Use Data to Make Better Decisions: Track asset performance and maintenance to make informed decisions about replacements, upgrades, or repairs.
- Focus on Preventive Maintenance: Stay ahead of problems by scheduling regular maintenance to extend the life of your assets.
- Train Your Team: Ensure everyone involved understands the process and has the necessary tools and training to stay efficient.
- Encourage Accountability: Assign clear ownership of assets at every stage to avoid confusion and keep things on track.
- Adapt to Change: Be ready to adjust your workflow as unexpected situations arise, ensuring quick responses to any disruptions.
Integrating Asset Tracking with AssetLoom
To make asset management even more efficient, it is essential to integrate an asset tracking system. AssetLoom helps automate and streamline the entire asset lifecycle from acquisition to retirement by providing a centralized platform where you can track and manage all your assets in real time.
With AssetLoom, you can:
- Automate tracking: Keep real-time records of asset status, location, and condition.
- Schedule maintenance: Set up automated reminders for maintenance and updates.
- Generate reports: Access detailed reports to analyze asset performance and identify opportunities for improvement.
- Ensure compliance: Track license renewals, warranties, and regulatory requirements easily.
By using AssetLoom, you can improve transparency, reduce manual errors, and ensure your workflow is more efficient and organized.
Conclusion
Building a well-organized, standardized asset lifecycle workflow might seem like a big task, but with the right steps, it’s completely achievable. By clearly defining asset categories, mapping out each stage of the lifecycle, and automating where possible, you can streamline your workflow and ensure smoother operations for your team.
Remember, the key to successful asset management isn’t just in creating the process. It’s about continually refining it to meet the needs of your organization. Regular reviews, clear roles, and data-driven decisions will keep your assets running smoothly and help you avoid unexpected issues.
So, take the time today to set up your asset lifecycle workflow and follow through with the best practices we’ve outlined. With the right foundation and a commitment to continuous improvement, your asset management efforts will save time, reduce costs, and allow your team to focus on what truly matters.

Related Blogs
ITAM in General
Fixing Inventory Sync Issues Between ITAM and ITSM Tools
ITAM in General
The Hidden Costs of a Stolen Work Laptop & How to Prevent Them
Subscribe for Expert Tips and Updates
Receive the latest news from AssetLoom. right in your inbox
